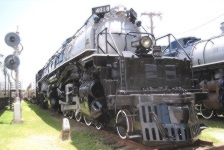
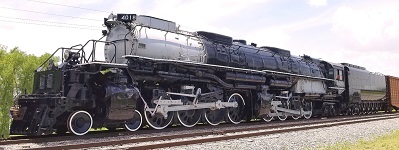
Union Pacific Big Boy 4018
The Drivers - Sept 27th, 2020
|
Barry Bogs' 1/22.5 scale Union Pacific Big Boy 4018 The Drivers - Sept 27th, 2020 |
|
 |
 |
 |
 |
 |
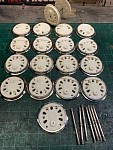 |
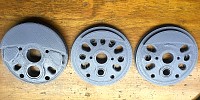
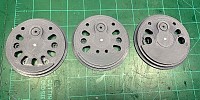
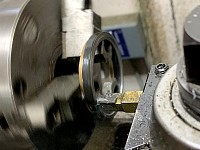
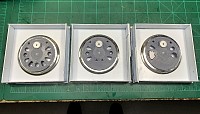
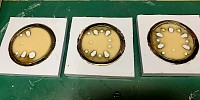
Barry explains his efforts and steps and construction of the drivers... ( pictures do not expand - view full size on main page ) Drivers for steam locomotives are key parts for any G scale locomotive build. The BB drivers are the largest driver that the boys in the shop have ever needed for a build. With that being said, where do I find a driver that size, that I could have cast, to be able to build the engine? We have a local group of guys that get together, well we use to get together each month to talk trains. I was talking to my good friend John Buckley, about building a Big Boy at one of the meetings some time ago. John is a member of a group called Maker Barn. These folks can make whatever they want with the wonderful tools that they have at the Barn. I found on the net, that a guy had 3D printed a 1:15th scale Big Boy and that the files were posted on the net for free use. John was able to download the files and directed me to a company called I-Solids not far from my house, that does 3D printing. The first picture is the 3D prints of the files on the net. As you can see, the wheels do not have the flanged tires on them, as they were a separate file to print. There were issues with the prints, like the holes were not the right size and the crank pin holes were not the same distance apart. Kason at I-Solids put the files into the Solid Works application and tried to correct the issues, but in the end, just gave up and created the same drivers with tires on them that you see in the second picture. I had them printed oversize so that when I sent them to the metal caster, the production parts would be the right size. Well, my buddy John reached out to a company in Texas that would make the castings for me in metal. They only wanted a little less than 10 thousand dollars for the castings! Uh, want planet are they on anyway? Thanks, but no thanks! But what options do I have now? My buddy Dennis said he knew of a guy in California who may do the job. After contacting him, he said that he would not do the job because he did not have a flask large enough for the parts. OK, now what? Well, it was time to talk my friend at Cumberland Model Engineering, David Queener. I was thinking that maybe I could have the driver tires made, plated and then cast the center wheel part with resin. David said that the tires could be made on a CNC lathe by a local shop, using some steel tube 1/4 inch thick. He said that once he gets his new shop built, he would have the CNC lathe to do the work, but that is sometime in the future. When I checked at some local shops, either they did not want to do the job, or the price was way to expensive to even consider. David said that the best thing to do was to find a manual lathe and do the job myself. My friend Dennis had such a lathe and invited all the boys in the shop to come use his lathe to make the tires. I loaded up the car and headed the six hours north to Dennis' house. After two days of cutting tube in slices with his cut off saw and turning them on his lathe (third picture), we made more than 16 Big Boy tires! With the steel tires made, it was time to get them nickel plated so that they do not rust over time. I took them to a local plating company and spent over $200 to get the tires plated. A week later, I got the plated tires back and now I needed the wheels to fit the tires. I went back to I-Solids to have Kason resize the prints while taking off the tires in the files. Another week later, I had the three different wheel prints that fit my tires (fourth picture). Now, I had the boys in the casting shop make rubber molds of each of the wheels and tires. Once the molds were ready, I had the boys put a tire in the mold and pour the resin in to make the castings in the fifth picture. After working all day in the casting shop, the boys cranked out all 16 drivers needed for the Big Boy project in the sixth picture. The boys also made the axles on the mini shop lathe, also seen in the sixth picture. There is also an all resin wheel set in the picture used as a test to see if the axles would work in the castings. I was assured that the process would work, as I had the boys make the wheel sets for the Western Maryland shay that the boys built a couple years ago. That engine has been flawless since it was pressed into service. With the wheels cast, now it was time to center drill the axle and crank pin holes. Well, the mini shop lathe is not large enough to do the job, so I sent them to my buddy Dennis for him to do the work on the lathe that we made the tires on. This is where I am at with the drivers now. Once Dennis does his work, the drivers will need to be assembled into quartered wheel sets with crank pins made for them. I hope you understand now the challenges (mentioned in other places). I usually start an engine project with the tender, but in this case I had to create the drivers because they were the key to if the project was even possible to build. I know this is too much information to process, but I hope it gives you some idea of what it takes to build a loco from scratch. It's never easy, but I think it is worth every minute and dollar I have spent on it. Well, stay tuned for more fun(?) to come. My thanks to all my friends that are so willing to help me with the issues that I need help with! Thanks so much for your time and interest in BLW. - Barry |
|
|
to the Driver's build page |